Volume-based Change→
Hasper supports a second approach to change manage involving volumes. The idea is to take snapshots of volumes and deploy them.
Common setup for azure→
Common setup for azure→
One time infra changes needed for Azure deployment
Register Application→
Register an application that will allow deployment python script to be used from the build and staging servers
- Go to the Azure portal and sign in using your credentials.
- Look for "App registration" in azure services. Click on the "App registration". If you do not see this option check with the system admin team to provide the necessary permissions/roles in Azure active directory (Azure AD). Typically users under role Application Developer, Application Administrator, Cloud Application Administrator, Global Administrator, have access to this option.

- This will navigate you to the app registration home screen. Under "All applications" tab you would find existing app registrations (if any).

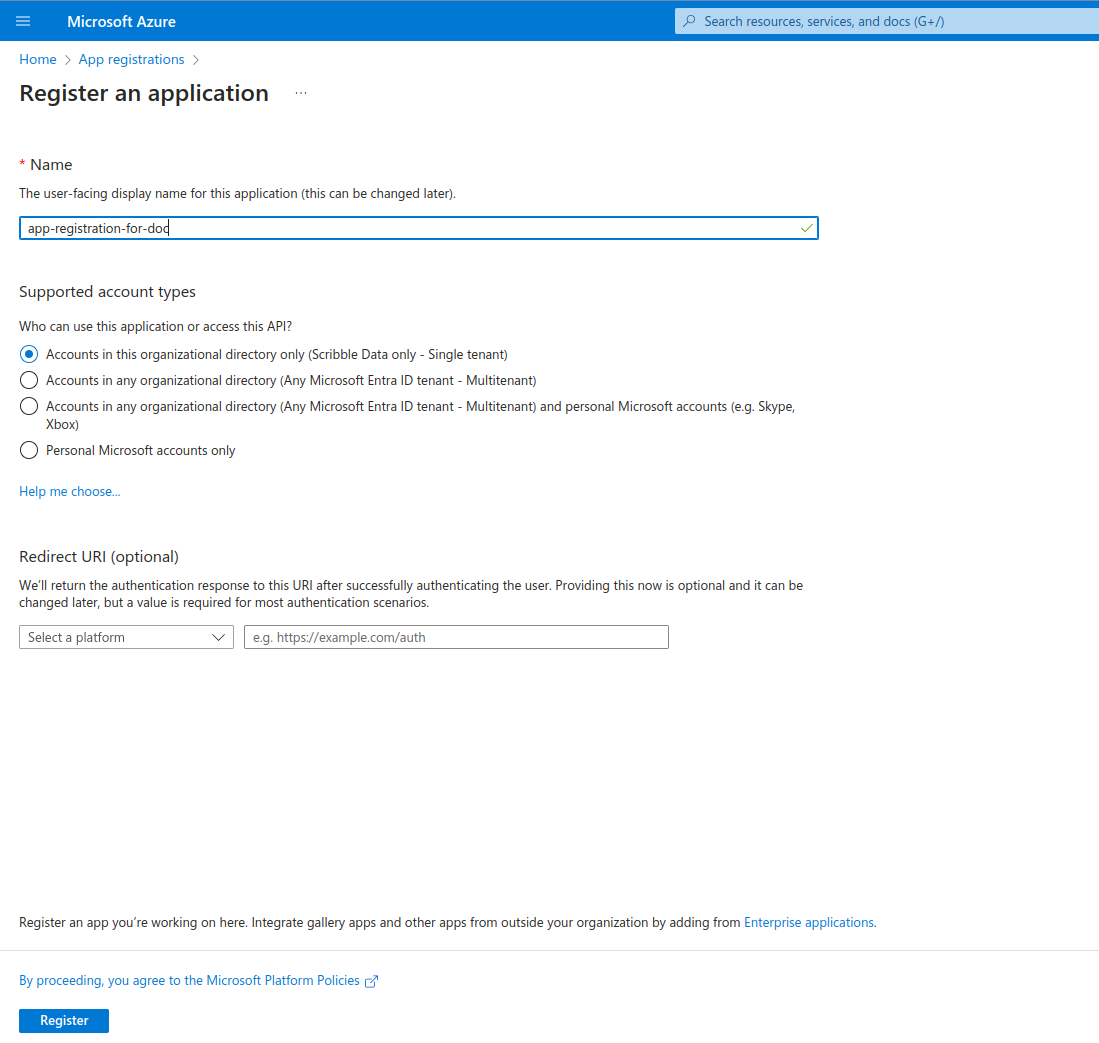
- Click on "New registration". This will navigate you to the "Register an application" page.

- Mention name, who can use this application on access this App.
For example, use
scribble-deployas name. Select "Accounts in this organizational directory only - Single tenant" - Click on "Register". This will create the app registration.
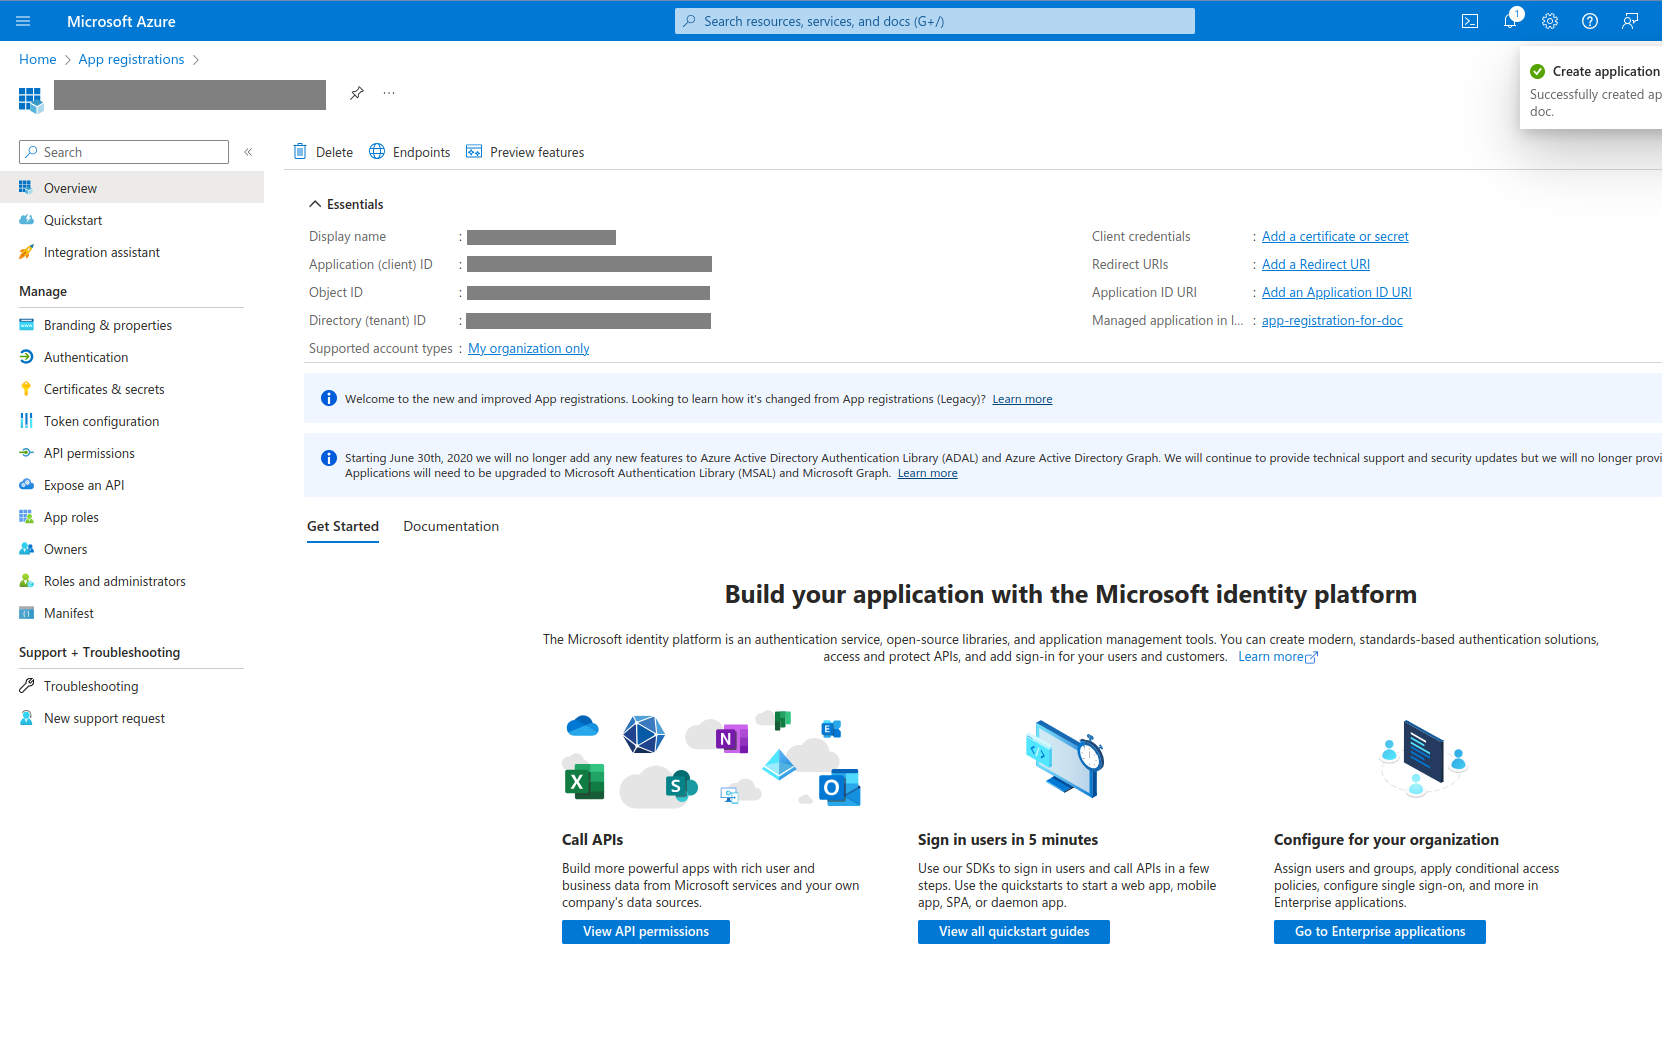
- You will be navigated to the app details page where you can find the "Application (client) ID". Copy this ID and add it to siteconf. This will be used as the
client_idin the deploy config. Also, this page will show Directory (tenant) ID. Copy this ID and add it to siteconf. This will be used as thetenant_idin the deploy config.
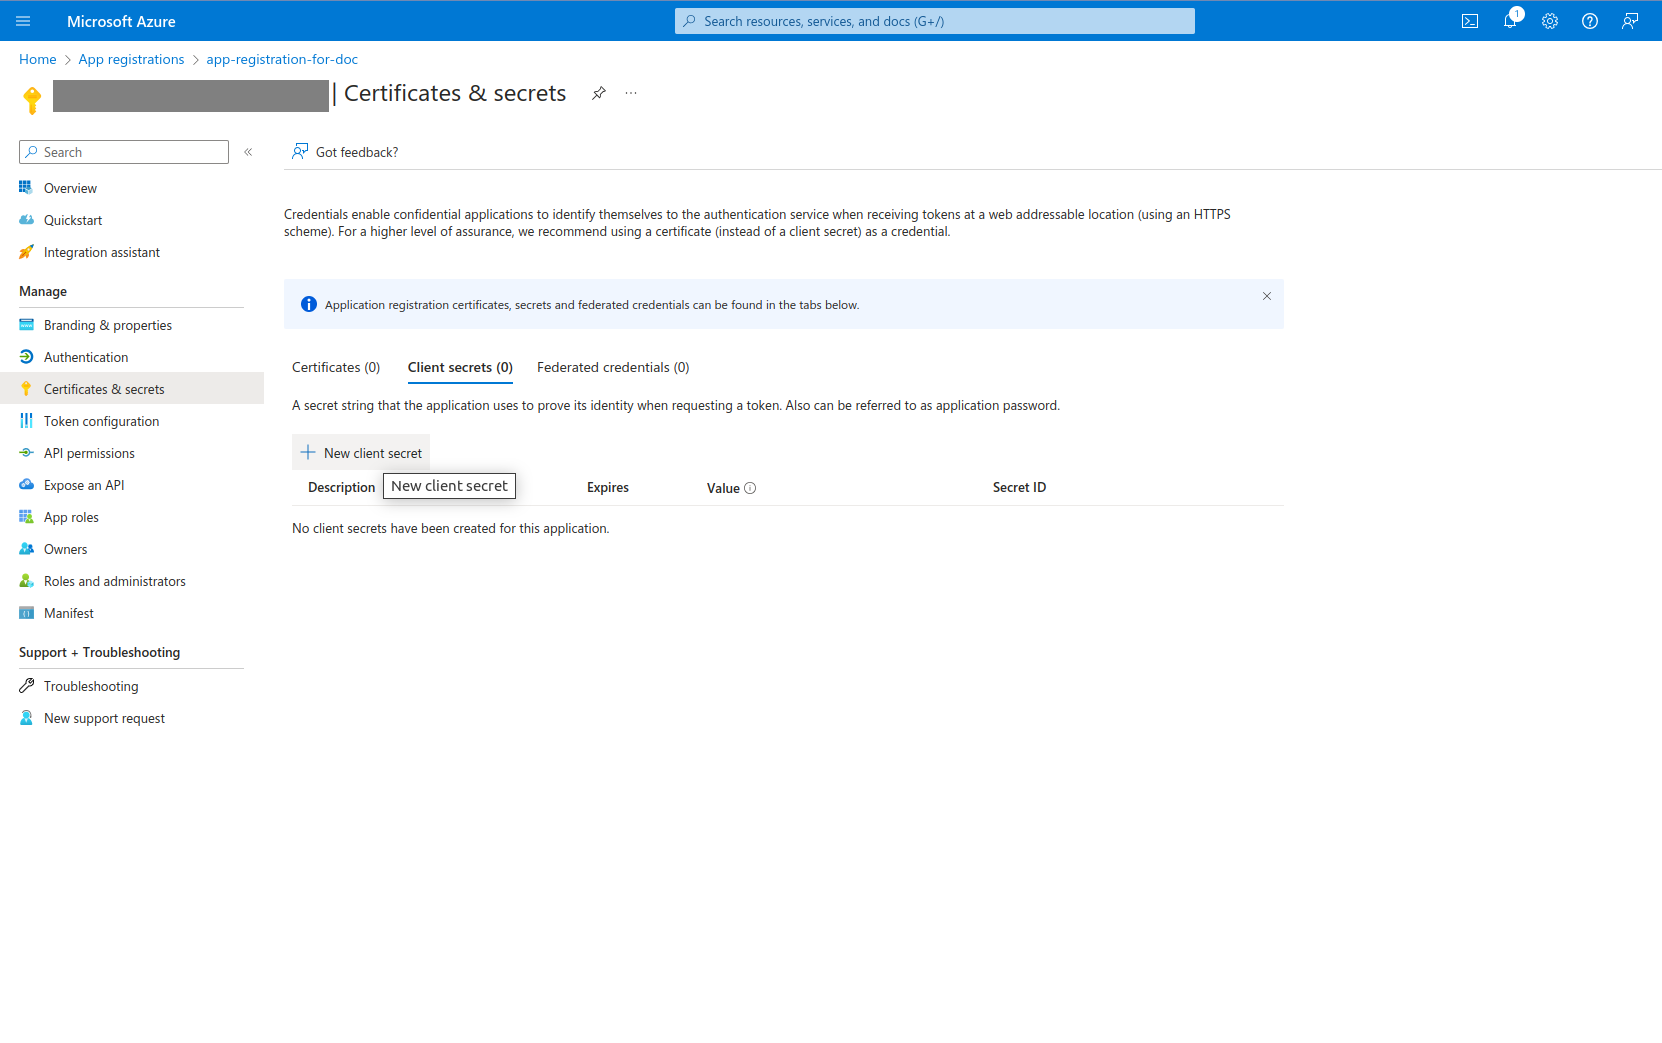
- Select certifications and secrets from left pane. You will be navigated to certificates and secrets page. Select
Client secretstab and click onNew client secret.
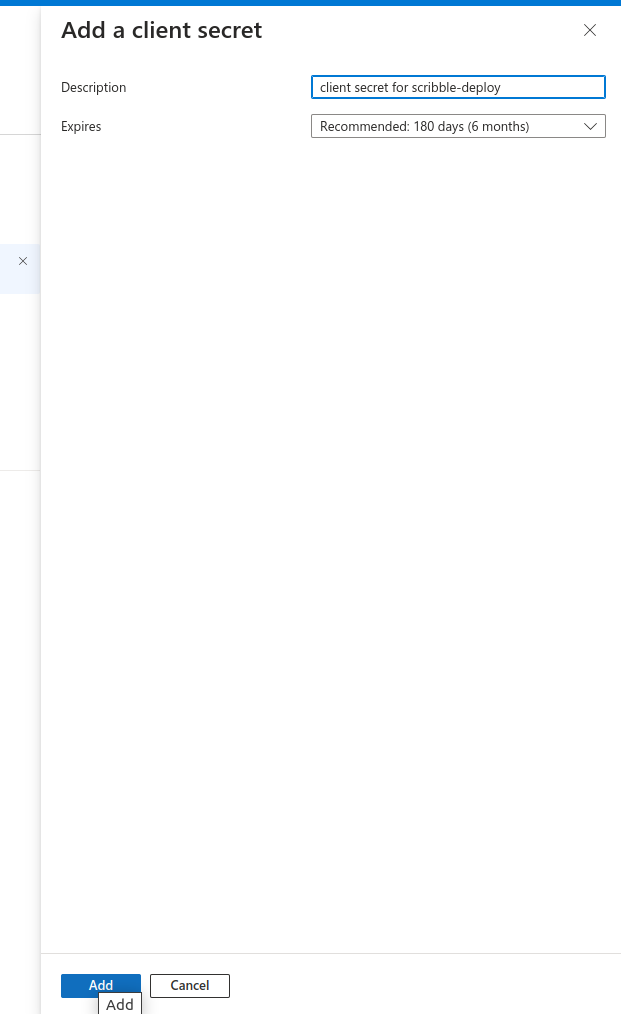
- Right page will open up a dialogue to specify client secret description and expiry. Please specify description for example,
Client secrets for scribble deploy. Please refer to organization policy for expiry. Click onAdd.
- Client secrets tab would show secret id, value for the new secret created. Note down the
valuefield from client secret. This will be used as theclient_secretin the deploy script. You would need to create new client secret if you lose the value.
Grant Permissions→
Grant necessary permissions for the Management Application
- If you are using azure disk mount based deployment following permissions needs to be granted for the Application (Client) id generated in the steps above.
[ "Microsoft.Compute/disks/read", "Microsoft.Compute/disks/write", "Microsoft.Compute/disks/delete", "Microsoft.Compute/disks/beginGetAccess/action", "Microsoft.Compute/snapshots/read", "Microsoft.Compute/snapshots/write", "Microsoft.Compute/snapshots/delete", "Microsoft.Compute/virtualMachines/read", "Microsoft.Compute/virtualMachines/write", "Microsoft.Network/networkInterfaces/join/action", "Microsoft.Resources/subscriptions/resourcegroups/read" ] -
As a reference following script is available to define respective role definitions, role assignments in your resource groups. https://github.com/scribbledata/scribble-utils/blob/main/azure-server/role_assignments.sh
Granting this permissions would require specific roles which allows
Microsoft.Authorization/roleAssignments/writeat the resource group level. If you do not have this permission granted please contact your IT/infra team so that they can grant these permissions for the application (client) id generated in the previous steps. 3. You would need to adjust the values specific to your environment.
Create Blob storage container→
- Create storage account in Azure portal. This step is optional. You can reuse the existing storage account if you want. Sample command from azure cli is given below.
az storage account create --name <your-storage-account-name> --resource-group <your-resource-group-name> --location eastus
az storage container create --name <your-container-name> --account-name <your-storage-account-name> --auth-mode login
az role assignment create --role "Storage Blob Data Contributor" --assignee <APPLICATION_CLIENT_ID> --scope /subscriptions/<SUBSCRIPTION_ID>/resourceGroups/<RESOURCE_GROUP>/providers/Microsoft.Storage/storageAccounts/<STORAGE_ACCOUNT_NAME>/blobServices/default/containers/<CONTAINER_NAME>
Setup for build server→
- SSH to the VM.
- Create directory for storing the credentials
- Create template for credentials.json using following command:
- Check contents of credentials.json Sample output
- Create template for config.json using following command:
echo '{ "azure_deploy_config": { "subscription_id": "<MODIFY THIS VALUE>", "build_resource_group_name": "<MODIFY THIS VALUE>", "target_resource_group_name": "<MODIFY THIS VALUE>", "target_vm_name": "<MODIFY THIS VALUE>", "location": "<MODIFY THIS VALUE>", "build_vm_name": "<MODIFY THIS VALUE>", "disk_sku": "StandardSSD_LRS", "disk_size_gb": { "code": 20, "config": 1, "data": 100 }, "blob_storage":{ "storage_account_name": "<MODIFY THIS VALUE>", "container_name": "<MODIFY THIS VALUE>" } } }' > config.json - Check contents of config.json
Sample output
{ "azure_deploy_config": { "subscription_id": "<MODIFY THIS VALUE>", "build_resource_group_name": "<MODIFY THIS VALUE>", "target_resource_group_name": "<MODIFY THIS VALUE>", "target_vm_name": "<MODIFY THIS VALUE>", "location": "<MODIFY THIS VALUE>", "build_vm_name": "<MODIFY THIS VALUE>", "disk_sku": "StandardSSD_LRS", "disk_size_gb": { "code": 30, "config": 1, "data": 100 }, "blob_storage":{ "storage_account_name": "<MODIFY THIS VALUE>", "container_name": "<MODIFY THIS VALUE>" } } } -
Edit values in
credentials.json.tenant_id: This is theDirectory (tenant) IDfrom the app registration details. (Step 7 in register-application).client_id: This is theApplication (client) IDfrom the app registration details. (Step 7 in register-application).client_secret: This is thevaluefrom the client secret details. (Step 10 in register-application).
-
Edit values in
config.json.-
subscription_id: This is the subscription id of the azure account. This can be found in the azure portal. If you have multiple subscriptions, you can select the subscription you want to use for a particular deployment; you can check output of the following command. Select the suitable subscription id from the list. -
build_resource_group_name: This is the resource group name where the build-server VM is present. You can check the list of resource groups in your subscription using the following command.az group list --output table -
target_resource_group_name: This is the resource group name where the staging-server VM is present. This can be same as the build resource group. -
target_vm_name: This is name of staging-server VM. Look at the azure portal for the vm name. Deployment assumes that the VM of specified size is already provised. This is target value would be different for staging and production environment. For config on staging use vm name of the staging. For config file on production use the vm name of the production. This value will be read by the upgrade script running on the server. Note that, this value could be different than hostname. It is used by azure commands to identify the VM. You can check the list of VMs using the following command -
location: This is azure region to be used for creating the disk. e.g.eastus. You can find it using the following command -
disk_sku: The SKU of the disk. The SKU determines the disk performance and pricing. The following are the possible values for this parameter:StandardSSD_LRS,Premium_LRS,Standard_LRS,UltraSSD_LRS,Standard_ZRS,Premium_ZRS,StandardSSD_ZRS,UltraSSD_ZRS. LRS stands for Locally Redundant Storage and ZRS stands for Zone Redundant Storage.NOTE: We recommend StandardSSD_LRS
-
build_vm_name: This is the name of the VM for the build server. Look at the azure portal for the vm name. -
disk_size_gb: This is the disk size in GB for the code, config and data disks. This is used for creating the disks. -
blob_storage: This is the blob storage details.storage_account_name: This is the storage account name where the container is created. (Step 1 in create-blob-storage-container))container_name: This is the container name where the datasets are uploaded. (Step 2 in create-blob-storage-container).
-
-
Download encrypt utility script to encrypt the credentials.
- Encrypt azure credentials using following command.
This script will ask for a user input for the password for encryption. Please choose strong password which is mix of alphabets, numbers and special characters. Sample output for this command is as follows:
./encrypt-util.sh ~/.private/credentials/azure/credentials.json ~/.private/credentials/azure/config.jsonThis will create encrypted file./encrypt-util.sh credentials.json config.json Encrypting given files using user provided password. Please provide the password of your choice. Password: #my@very_verylong?password123 7-Zip [64] 16.02 : Copyright (c) 1999-2016 Igor Pavlov : 2016-05-21 p7zip Version 16.02 (locale=en_IN,Utf16=on,HugeFiles=on,64 bits,12 CPUs 13th Gen Intel(R) Core(TM) i5-1335U (B06A3),ASM,AES-NI) Open archive: cred.zip -- Path = cred.zip Type = zip Physical Size = 792 Scanning the drive: 1 file, 216 bytes (1 KiB) Updating archive: cred.zip Items to compress: 1 Files read from disk: 1 Archive size: 792 bytes (1 KiB) Everything is Ok 7-Zip [64] 16.02 : Copyright (c) 1999-2016 Igor Pavlov : 2016-05-21 p7zip Version 16.02 (locale=en_IN,Utf16=on,HugeFiles=on,64 bits,12 CPUs 13th Gen Intel(R) Core(TM) i5-1335U (B06A3),ASM,AES-NI) Open archive: cred.zip -- Path = cred.zip Type = zip Physical Size = 792 Scanning the drive: 1 file, 652 bytes (1 KiB) Updating archive: cred.zip Items to compress: 1 Files read from disk: 1 Archive size: 792 bytes (1 KiB) Everything is Ok Encrypted creds in cred.zip Testing decryption using given password. 7-Zip [64] 16.02 : Copyright (c) 1999-2016 Igor Pavlov : 2016-05-21 p7zip Version 16.02 (locale=en_IN,Utf16=on,HugeFiles=on,64 bits,12 CPUs 13th Gen Intel(R) Core(TM) i5-1335U (B06A3),ASM,AES-NI) Scanning the drive for archives: 1 file, 792 bytes (1 KiB) Extracting archive: cred.zip -- Path = cred.zip Type = zip Physical Size = 792 Everything is Ok Files: 2 Size: 868 Compressed: 792 Decrypted creds from cred.zip to 'decrypted' directory File config.json matches File credentials.json matches All files match Encryption, decryption, and testing successful. Cleaning up the files. Cleaning up the original files. Removing original file: credentials.json Removing original file: config.json Removing decrypted directory.cred.zipin the current directory.
Setup for staging server→
- SSH to the VM.
- Create directory for storing the credentials
- Create template for credentials.json using following command:
- Check contents of credentials.json Sample output
- Create template for config.json using following command:
echo '{ "azure_deploy_config": { "subscription_id": "<MODIFY THIS VALUE>", "build_resource_group_name": "<MODIFY THIS VALUE>", "target_resource_group_name": "<MODIFY THIS VALUE>", "target_vm_name": "<MODIFY THIS VALUE>", "location": "<MODIFY THIS VALUE>", "build_vm_name": "<MODIFY THIS VALUE>", "disk_sku": "StandardSSD_LRS", "disk_size_gb": { "code": 20, "config": 1, "data": 100 }, "blob_storage":{ "storage_account_name": "<MODIFY THIS VALUE>", "container_name": "<MODIFY THIS VALUE>" } } }' > config.json - Check contents of config.json
Sample output
{ "azure_deploy_config": { "subscription_id": "<MODIFY THIS VALUE>", "build_resource_group_name": "<MODIFY THIS VALUE>", "target_resource_group_name": "<MODIFY THIS VALUE>", "target_vm_name": "<MODIFY THIS VALUE>", "location": "<MODIFY THIS VALUE>", "build_vm_name": "<MODIFY THIS VALUE>", "disk_sku": "StandardSSD_LRS", "disk_size_gb": { "code": 20, "config": 1, "data": 100 }, "blob_storage":{ "storage_account_name": "<MODIFY THIS VALUE>", "container_name": "<MODIFY THIS VALUE>" } } } -
Edit values in
credentials.json.tenant_id: This is theDirectory (tenant) IDfrom the app registration details. (Step 7 in register-application).client_id: This is theApplication (client) IDfrom the app registration details. (Step 7 in register-application).client_secret: This is thevaluefrom the client secret details. (Step 10 in register-application).
-
Edit values in
config.json.subscription_id: This is the subscription id of the azure account. This can be found in the azure portal.build_resource_group_name: This is the resource group name where the build-server VM is present.target_resource_group_name: This is the resource group name where the staging-server VM is present. This can be same as the build resource group.target_vm_name: This is name of staging-server VM. Look at the azure portal for the vm name.location: This is azure region to be used for creating the disk. e.g.eastus.build_vm_name: This is the name of the VM for the build server. Look at the azure portal for the vm name.disk_size_gb: This is the disk size in GB for the code, config and data disks. This is used for creating the disks.blob_storage: This is the blob storage details.storage_account_name: This is the storage account name where the container is created. (Step 1 in create-blob-storage-container))container_name: This is the container name where the datasets are uploaded. (Step 2 in create-blob-storage-container).
- Download encrypt utility script to encrypt the credentials.
- Encrypt azure credentials using following command. This script will ask for a user input for the password for encryption. Please choose strong password which is mix of alphabets, numbers and special characters.
Sample output for this command is as follows:
./encrypt-util.sh credentials.json config.json
Encrypting given files using user provided password.
Please provide the password of your choice.
Password: #my@very_verylong?password123

7-Zip [64] 16.02 : Copyright (c) 1999-2016 Igor Pavlov : 2016-05-21
p7zip Version 16.02 (locale=en_IN,Utf16=on,HugeFiles=on,64 bits,12 CPUs 13th Gen Intel(R) Core(TM) i5-1335U (B06A3),ASM,AES-NI)

Open archive: cred.zip
--
Path = cred.zip
Type = zip
Physical Size = 792

Scanning the drive:
1 file, 216 bytes (1 KiB)

Updating archive: cred.zip

Items to compress: 1


Files read from disk: 1
Archive size: 792 bytes (1 KiB)
Everything is Ok

7-Zip [64] 16.02 : Copyright (c) 1999-2016 Igor Pavlov : 2016-05-21
p7zip Version 16.02 (locale=en_IN,Utf16=on,HugeFiles=on,64 bits,12 CPUs 13th Gen Intel(R) Core(TM) i5-1335U (B06A3),ASM,AES-NI)

Open archive: cred.zip
--
Path = cred.zip
Type = zip
Physical Size = 792

Scanning the drive:
1 file, 652 bytes (1 KiB)

Updating archive: cred.zip

Items to compress: 1


Files read from disk: 1
Archive size: 792 bytes (1 KiB)
Everything is Ok
Encrypted creds in cred.zip
Testing decryption using given password.

7-Zip [64] 16.02 : Copyright (c) 1999-2016 Igor Pavlov : 2016-05-21
p7zip Version 16.02 (locale=en_IN,Utf16=on,HugeFiles=on,64 bits,12 CPUs 13th Gen Intel(R) Core(TM) i5-1335U (B06A3),ASM,AES-NI)

Scanning the drive for archives:
1 file, 792 bytes (1 KiB)

Extracting archive: cred.zip
--
Path = cred.zip
Type = zip
Physical Size = 792

Everything is Ok

Files: 2
Size:       868
Compressed: 792
Decrypted creds from cred.zip to 'decrypted' directory
File config.json matches
File credentials.json matches
All files match
Encryption, decryption, and testing successful.
Cleaning up the files.
Cleaning up the original files.
Removing original file: credentials.json
Removing original file: config.json
Removing decrypted directory.
cred.zip in the current directory.
Setup for production server→
- SSH to the VM.
- Create directory for storing the credentials
- Create template for credentials.json using following command:
- Check contents of credentials.json Sample output
- Create template for config.json using following command:
echo '{ "azure_deploy_config": { "subscription_id": "<MODIFY THIS VALUE>", "build_resource_group_name": "<MODIFY THIS VALUE>", "target_resource_group_name": "<MODIFY THIS VALUE>", "target_vm_name": "<MODIFY THIS VALUE>", "location": "<MODIFY THIS VALUE>", "build_vm_name": "<MODIFY THIS VALUE>", "disk_sku": "StandardSSD_LRS", "disk_size_gb": { "code": 20, "config": 1, "data": 100 }, "blob_storage":{ "storage_account_name": "<MODIFY THIS VALUE>", "container_name": "<MODIFY THIS VALUE>" } } }' > config.json - Check contents of config.json
Sample output
{ "azure_deploy_config": { "subscription_id": "<MODIFY THIS VALUE>", "build_resource_group_name": "<MODIFY THIS VALUE>", "target_resource_group_name": "<MODIFY THIS VALUE>", "target_vm_name": "<MODIFY THIS VALUE>", "location": "<MODIFY THIS VALUE>", "build_vm_name": "<MODIFY THIS VALUE>", "disk_sku": "StandardSSD_LRS", "disk_size_gb": { "code": 20, "config": 1, "data": 100 }, "blob_storage":{ "storage_account_name": "<MODIFY THIS VALUE>", "container_name": "<MODIFY THIS VALUE>" } } } -
Edit values in
credentials.json.tenant_id: This is theDirectory (tenant) IDfrom the app registration details. (Step 7 in register-application).client_id: This is theApplication (client) IDfrom the app registration details. (Step 7 in register-application).client_secret: This is thevaluefrom the client secret details. (Step 10 in register-application).
-
Edit values in
config.json.subscription_id: This is the subscription id of the azure account. This can be found in the azure portal.build_resource_group_name: This is the resource group name where the build-server VM is present.target_resource_group_name: This is the resource group name where the production-server VM is present. This can be same as the build resource group.target_vm_name: This is name of production-server VM. Look at the azure portal for the vm name.location: This is azure region to be used for creating the disk. e.g.eastus.build_vm_name: This is the name of the VM for the build server. Look at the azure portal for the vm name.disk_size_gb: This is the disk size in GB for the code, config and data disks. This is used for creating the disks.blob_storage: This is the blob storage details.storage_account_name: This is the storage account name where the container is created. (Step 1 in create-blob-storage-container))container_name: This is the container name where the datasets are uploaded. (Step 2 in create-blob-storage-container).
- Download encrypt utility script to encrypt the credentials.
- Encrypt azure credentials using following command. This script will ask for a user input for the password for encryption. Please choose strong password which is mix of alphabets, numbers and special characters.
Sample output for this command is as follows:
./encrypt-util.sh credentials.json config.json
Encrypting given files using user provided password.
Please provide the password of your choice.
Password: #my@very_verylong?password123

7-Zip [64] 16.02 : Copyright (c) 1999-2016 Igor Pavlov : 2016-05-21
p7zip Version 16.02 (locale=en_IN,Utf16=on,HugeFiles=on,64 bits,12 CPUs 13th Gen Intel(R) Core(TM) i5-1335U (B06A3),ASM,AES-NI)

Open archive: cred.zip
--
Path = cred.zip
Type = zip
Physical Size = 792

Scanning the drive:
1 file, 216 bytes (1 KiB)

Updating archive: cred.zip

Items to compress: 1


Files read from disk: 1
Archive size: 792 bytes (1 KiB)
Everything is Ok

7-Zip [64] 16.02 : Copyright (c) 1999-2016 Igor Pavlov : 2016-05-21
p7zip Version 16.02 (locale=en_IN,Utf16=on,HugeFiles=on,64 bits,12 CPUs 13th Gen Intel(R) Core(TM) i5-1335U (B06A3),ASM,AES-NI)

Open archive: cred.zip
--
Path = cred.zip
Type = zip
Physical Size = 792

Scanning the drive:
1 file, 652 bytes (1 KiB)

Updating archive: cred.zip

Items to compress: 1


Files read from disk: 1
Archive size: 792 bytes (1 KiB)
Everything is Ok
Encrypted creds in cred.zip
Testing decryption using given password.

7-Zip [64] 16.02 : Copyright (c) 1999-2016 Igor Pavlov : 2016-05-21
p7zip Version 16.02 (locale=en_IN,Utf16=on,HugeFiles=on,64 bits,12 CPUs 13th Gen Intel(R) Core(TM) i5-1335U (B06A3),ASM,AES-NI)

Scanning the drive for archives:
1 file, 792 bytes (1 KiB)

Extracting archive: cred.zip
--
Path = cred.zip
Type = zip
Physical Size = 792

Everything is Ok

Files: 2
Size:       868
Compressed: 792
Decrypted creds from cred.zip to 'decrypted' directory
File config.json matches
File credentials.json matches
All files match
Encryption, decryption, and testing successful.
Cleaning up the files.
Cleaning up the original files.
Removing original file: credentials.json
Removing original file: config.json
Removing decrypted directory.
cred.zip in the current directory.